Learn how to make beer can chicken on a pellet grill, and why it is one of the most fun ways to cook a whole chicken!
Whether you've got a Traeger, Pit Boss, Camp Chef, Yoder, or any other type of pellet grill, we've got you covered!
Let's Go!
Beer can chicken is simply a whole chicken propped up on a full or partially full can of beer inside the cavity to position it while it cooks.
Beer can chicken is usually cooked on a grill or in a smoker, and like cooking any whole chicken, needs to be done with indirect heat so that the poultry is cooked completely through without burning or drying out.
This makes the set it and forget it smoky indirect heat of a pellet grill, whether its a Traeger, Pit Boss, Yoder, etc, perfect for cooking beer can chicken at home.
Set your temperature, set up the beer can chicken, and cook away!
Jump to:
Considerations
Besides the obvious Instagramable fun and cool factors of propping a whole chicken on a can of beer, there are some really good reasons to cook chicken this way.
And...there are some important health and safety reasons NOT to prepare beer can chicken exactly as described above.
Pros:
- You position the whole chicken with ALL the skin off the grates of the pellet grill. This allows every inch of skin on the bird, whether white meat or dark meat to get crispy. This is why so many people love rotisserie chicken!
- The moisture from the evaporating beer helps keep the meat moist and some argue infuses some of the beer's flavor into the chicken, depending on the beer you choose.
- Much like using rib racks for a large batch of baby back ribs, by positioning the whole chicken vertically you free up some extra space on your pellet grill to cook several beer can chickens at once or create room for other side dishes such as potatoes and vegetables.
Cons:
Safety
The biggest con is that it's actually not very safe to cook a can of beer at high or low heat in contact with your food for any period of time.
There are paints, plastics, and chemicals in the can and on the label that can leach into your food that you don't want to consume.
If you still want to give it a try, we recommend utilizing one of the many beer can chicken roasters on the market that you can still use to pour your beer into and position your chicken, without the chemicals from the beer label!

- The juiciest, crispiest, flavorful chicken ever want to impress your guest or dad? Here’s a simple trick! Buy Mountain Grillers beer can chicken roaster! Pour your favorite beer in the canister, and don’t forget to leave a little for the cook! Lock the canister in place, stand any size chicken on the vertical holder, rub the belly with your favorite seasonings, and in no time you will have the most incredibly moist, perfectly crispy, and delicious chicken ever.
Airflow
Secondly, many purists argue that the beer can, or even beer can holder, doesn't really add anything to the chicken.
In fact, they say that a cold canister of liquid shoved up the chicken's, well...cavity...only SLOWS down the cooking of the bird and results in overcooked and dry meat.
We agree maybe in theory that nothing beats a pellet grill spatchcocked chicken if you are going for the absolute best cooked whole chicken you've ever tasted.
But we think our recipe below for beer can chicken made on a pellet grill is pretty good too, and hey, it's fun (and easier) to make, especially if you like experimenting and cooking with beer!
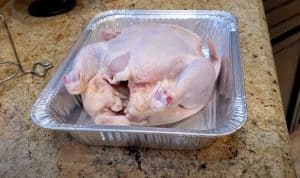
Clean and Trim the Whole Chickens
Take some time to clean, rinse and dry your whole chicken(s) with paper towels after removing them from the packaging.
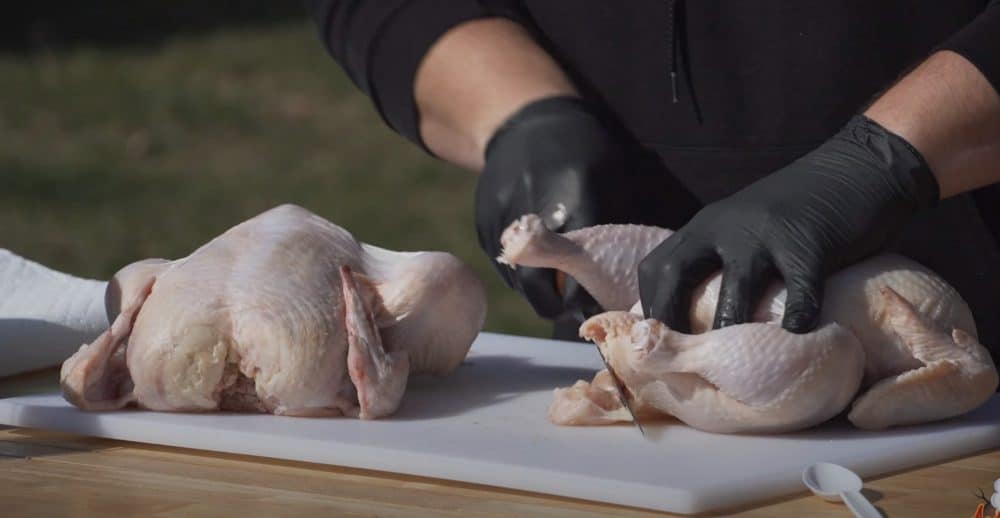
Remove any giblet bags or other items stuffed into the cavities. Then, using some good kitchen shears or a meat knife, cut any excess fat or skin hanging off near the corners and edges of the cavities.
There should not be too much trimming to do but it doesn't hurt to clean the chickens up a bit before you start seasoning and cooking on the beer can chicken roasters.
Wet Brining
One chicken prep method you'll read about over and over is brining.
At its most basic, this is just soaking the chicken overnight in a solution that includes salt, water and some aromatics.
But, what does it do? Well, the salt naturally penetrates overnight and helps to not only flavor the meat but help it retain moisture throughout the cooking process.
Do you need to brine your beer can chicken before you smoke it on the pellet grill?
The answer is, it depends.
Now, if you have a standard supermarket chicken that's already been injected with a brine solution, don't bother wet brining at home. It won't do anything.
If, on the other hand, you have a natural whole chicken without additives, you could take the time to brine it.
Now, just because the packaging says "All Natural" doesn't mean its organic, or hasn't been brined or injected with hormones or anything like that.
In fact, "All Natural" literally means NOTHING in most of the food and beauty industry.
We know, crazy.
So make sure to check the fine print if it actually has been pre-brined or injected with a sodium solution.
If you got your chicken direct from an organic farmers market or someone you know that raises them personally, you are probably good to go.
You can use one of the many brining recipes online (Alton Brown's is a classic) or save a bit of effort with a premade chicken brining solution.

Brining for a good 24 hours before you smoke it will yield a more flavorful, juicier bird, so the time in the brine can be worth it.![]()
Dry Brining
However, a much easier way to achieve similar results is by dry brining your beer can chicken instead.
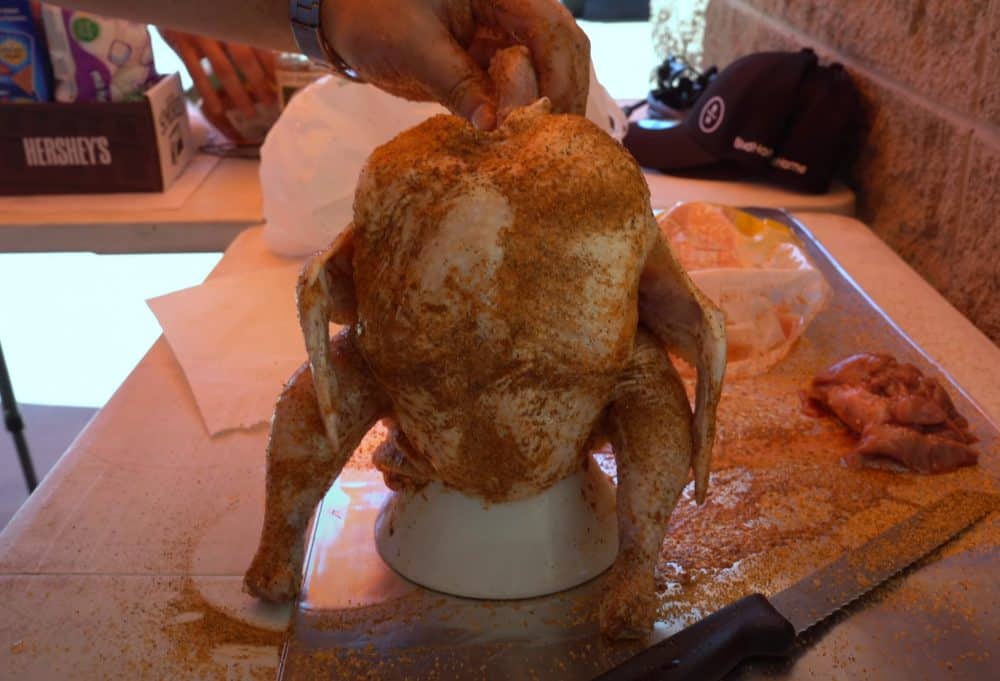
Simply coat the inside and outside with kosher salt and pepper (or your favorite BBQ rub) and store it on a drying rack set on top of a baking sheet in the refrigerator overnight.

- 🍒4 Pieces Baking Set - Including 2pcs baking sheet 17.3 x 12.2 x 1 inch and 2pcs cooling rack 16.8 x 11.22 x 0.67 inch
- 🍒Made of high quality 18/0 stainless steel without chemical coating or any other materials. Rust resistant.
Wipe off the excess salt left on the outside with a wet paper towel before you cook, and then season with all your non-salt herbs and seasonings.
Don't worry, the chicken is plenty well salted at this point from the salt penetrating overnight.

With dry brining, you get all the benefits of salt penetration and moisture retention without having to deal with a giant bucket of salty raw chicken water when you're done!
One other benefit, the salt really dries out the skin overnight, causing it to brown and crisp up much better while cooking on the pellet grill than it otherwise would have!
Pro Tip: DO NOT use cooking oil to help your rub adhere to the chicken skin. The more oil or butter you apply, the less the skin will crisp up when it cooks.
The exterior will get a little wet as you apply salt and water is drawn out of the chicken up to the salt.
This paste is all the moisture you need for the salt or rub to stick to the bird.
For the crispiest skin possible, dry brine the chicken overnight and then don't add ANY oil to the skin before putting it on the pellet grill.
The next day the skin should look kind of powdery and very dry.
This is good.
It means the salt has penetrated into the meat where you want it to be and taken all the moisture with it.
The skin will now crisp up nicely on the pellet grill while the inside meat stays moist.
The day of the cook you can add some crushed herbs or a low salt BBQ rub if you wish, but go easy on adding any additional salty rubs at this point.
Choosing Wood Pellets
You have a little bit of freedom when it comes to choosing the right wood pellets to cook beer can chicken on a pellet grill.
Mesquite should usually be avoided for poultry, especially when cooking for longer than a few minutes.
Hickory will give a very distinctive smoke flavor that many people love, and many others do not.
Alternatively, you can also go for a milder smoke flavor by choosing oak or fruitwood pellets.
Pecan, apple, beech, alder, and cherry all give great results on chicken.

- Includes 1 pound bag of each flavor Apple, Hickory, Mesquite, Cherry, Pecan and Jack Daniels
- Proudly Made in the USA
For fun, you can choose your woods seasonally, using beech and cherry in spring and summer and pecan and apple into the fall and winter.
Also no reason you can't mix a few different kinds together on a pellet grill.
Make sure you purchase pellets that are sized correctly to work in the hopper of your particular pellet grill.
Pellet Grills
In order to cook ANYTHING well on a pellet grill, you need to first have a basic understanding of how it works.
***Completely New to Using a Pellet Grill? No Worries!****
Hop over and check out this Complete Guide to Understanding How a Pellet Grill Works first if you are interested in learning more. We'll be here when you get back!***
First, you add hardwood pellets into a side hopper. The pellet grill automatically feeds these small wood pellets via an auger mechanism to a fire pot where they are burned up, providing both heat and smokey flavor.
The pellet grill automatically controls the flow of pellets depending on your temperature setting so that you maintain an even temperature throughout the entire cook.
A MUST for making great BBQ.
We are big fans of Bear Mountain Hardwood Pellets because they are compatible with most pellet grills and provide a nice clean, even burn and smoke flavor.
We particularly like using the Apple pellets for chicken and turkey.

- MILD CHERRY FLAVOR: Cherry BBQ pellets add a fruity, smoky flavor to your favorite red meat, fish, lamb, or pork dish
- ALL-NATURAL HARDWOODS: Made from 100% all-natural hardwoods with no flavorings, fillers, or additives
- USE WITH MULTIPLE GRILL TYPES: Ideal for all outdoor pellet grills, smokers, gas, charcoal, and electric grills
![]() Instead of being in and out of the house constantly trying to figure out when or whether to add more wood or to adjust the air flow, you just program the unit and give it time to do its thing.
Instead of being in and out of the house constantly trying to figure out when or whether to add more wood or to adjust the air flow, you just program the unit and give it time to do its thing.
It's really just a matter of choosing and preparing the right ingredients, picking the right temperature, and smoking your beer can chicken for the right amount of time.
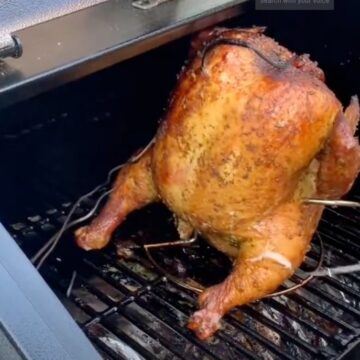
Cooking the Chicken
Now that the chicken is cleaned, brined, and seasoned, all that's left to do now is cook it.
With a pellet grill, this is the easy part!
Just add your chosen pellets to the hopper, plug in and start the pellet grill.
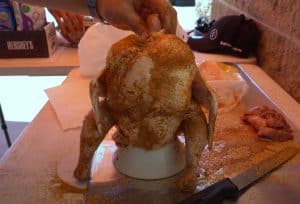
Let the pellet grill go through its start up process and once it has come up to temperature and stopped producing the thick white "start- up" smoke, pour some beer into the canister of your chosen Beer Can Roaster, place the chicken on top, and put it on the pellet grill!
Beer Can Roaster Options
Again, we highly recommend using a beer can chicken roaster rather than an actual beer can.
It will prevent leaching nasty ink and chemicals from the beer can label into your meat.
Secondly, most beer can chicken roasters are much sturdier and less likely to tip over than an actual beer can which will not sit so soundly on your pellet grill grates.
The last thing you want is your chicken constantly falling over every time you open the lid or check the temperature, or your beer pouring out everywhere and making a mess.
We like the MOUNTAIN GRILLERS Beer Can Chicken Roaster Stand if you want the sturdiest and most portable option to save the drippings or easily pick up and transfer your beer can chicken off the pellet grill when it's done.
The handles on the sides make this a breeze for moving around.
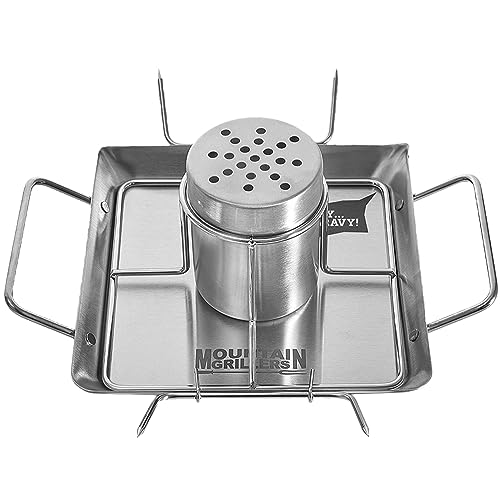
For a more streamlined option, check out the Sittin' Chicken Ceramic Beer Can Roaster. They also make a bigger option for turkeys!

Cooking Temperature
Set the temperature to 325°F, and let the grill come up to temperature.
While you technically CAN cook your chicken "low and slow" at 225-250°F like traditional pork and brisket barbecue, you will never get crispy skin because the fat underneath it will not render at those low temperatures before the meat is finished cooking.
Also avoid using BBQ rubs with lots and lots of sugar if you are going to cook any higher than 300-325°F because the sugar can burn and carbonize.
If you want to be extra cautious with a sugary BBQ rub, drop the cooking temperature on the pellet grill to 300°F.
Cooking Time
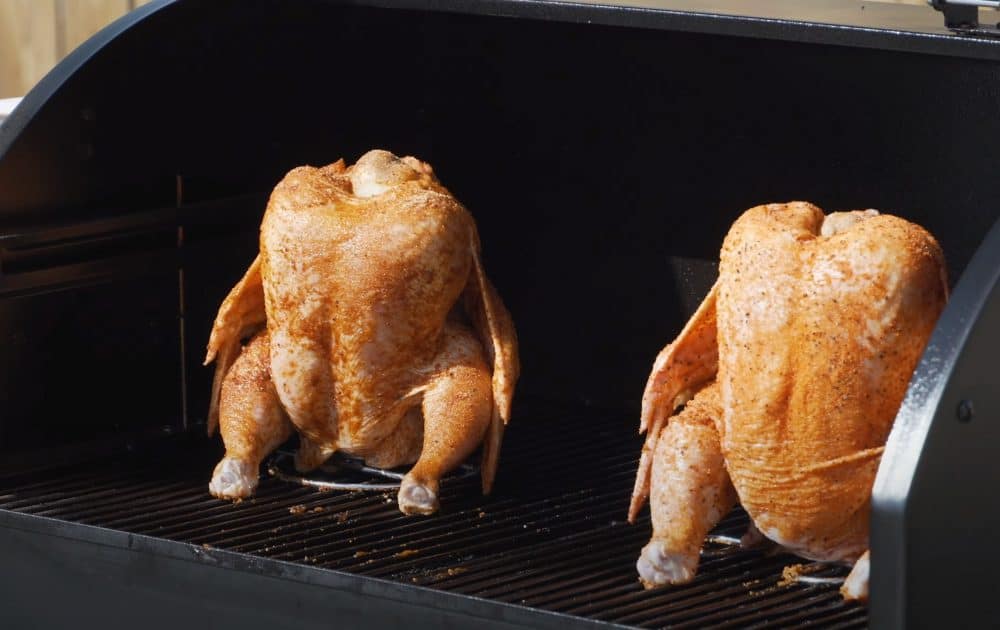
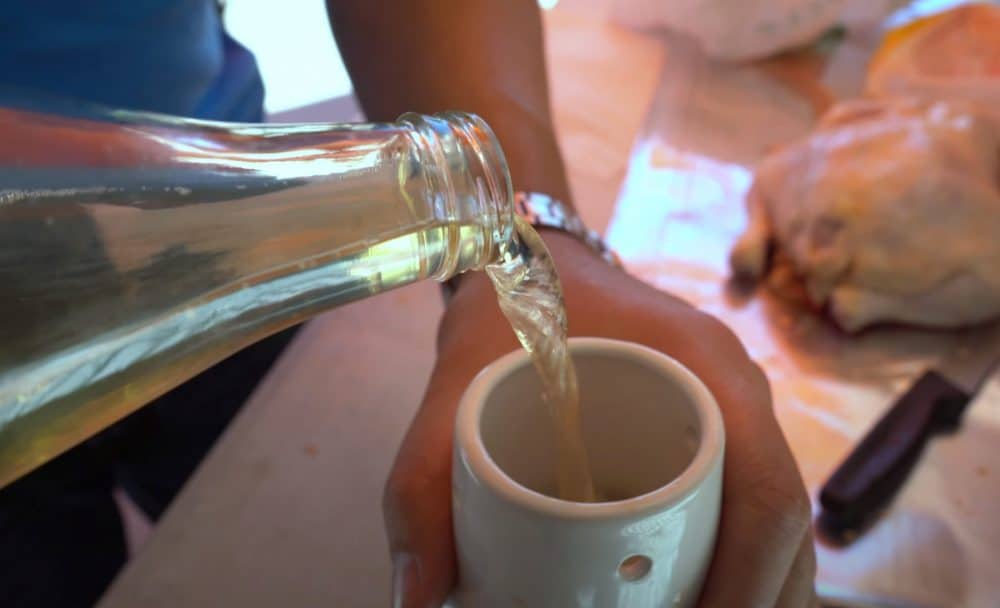
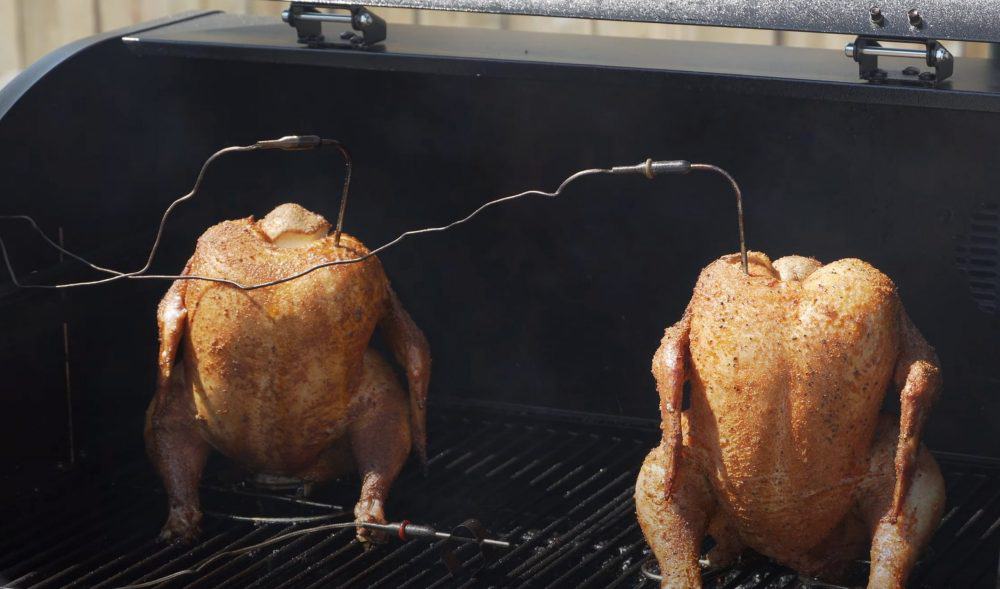
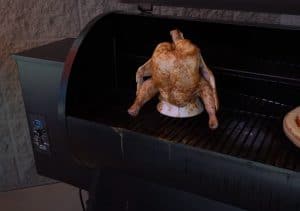
Fill your beer can chicken holder about ¾ of the way with your chosen beer and then position your on the stand.
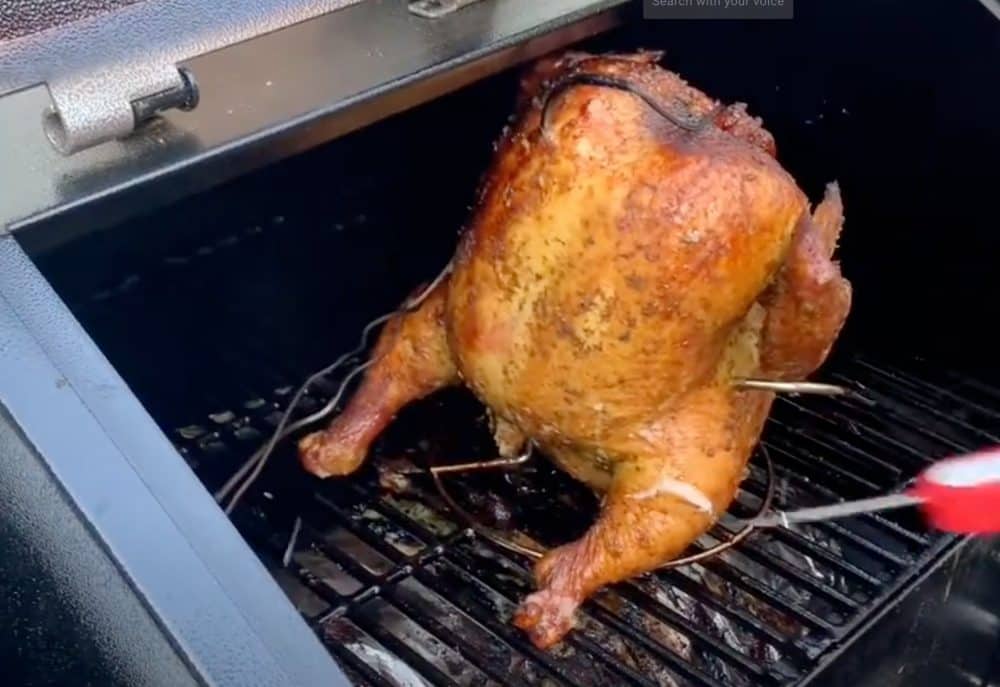
Place the beer can chicken in the cooking chamber of the pellet grill with the breast side facing to the left (the cooler side), and the back of the chicken to the right (the hotter side).
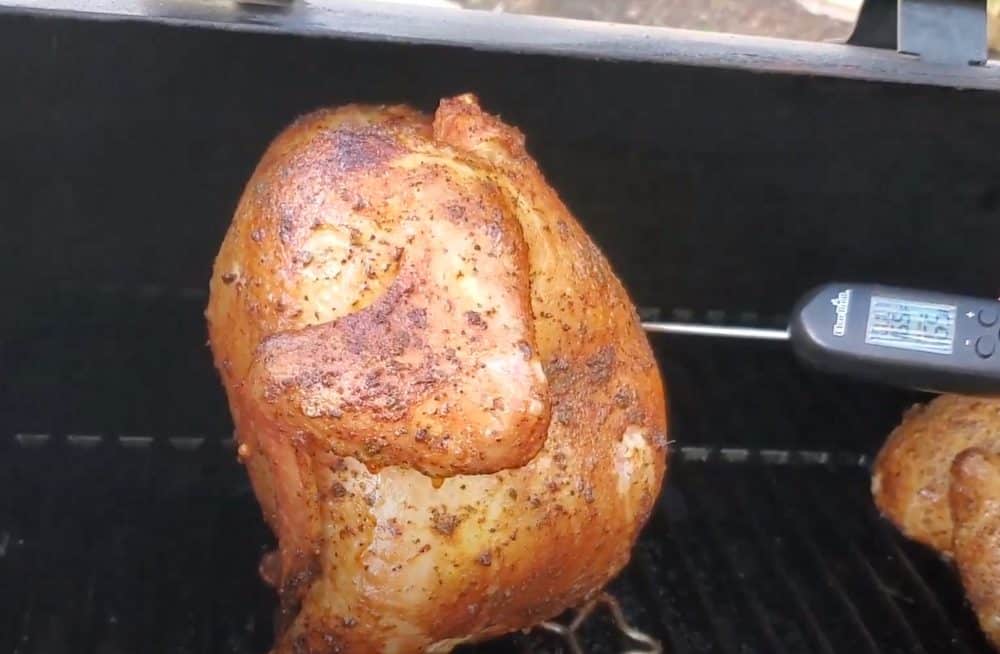
Place temperature probes, if you have them, in both one of the thighs and the breasts of the chicken. Otherwise, you can spot check later with an instant read thermometer.
Always use good insulated grill gloves when rotating or moving the chicken around.
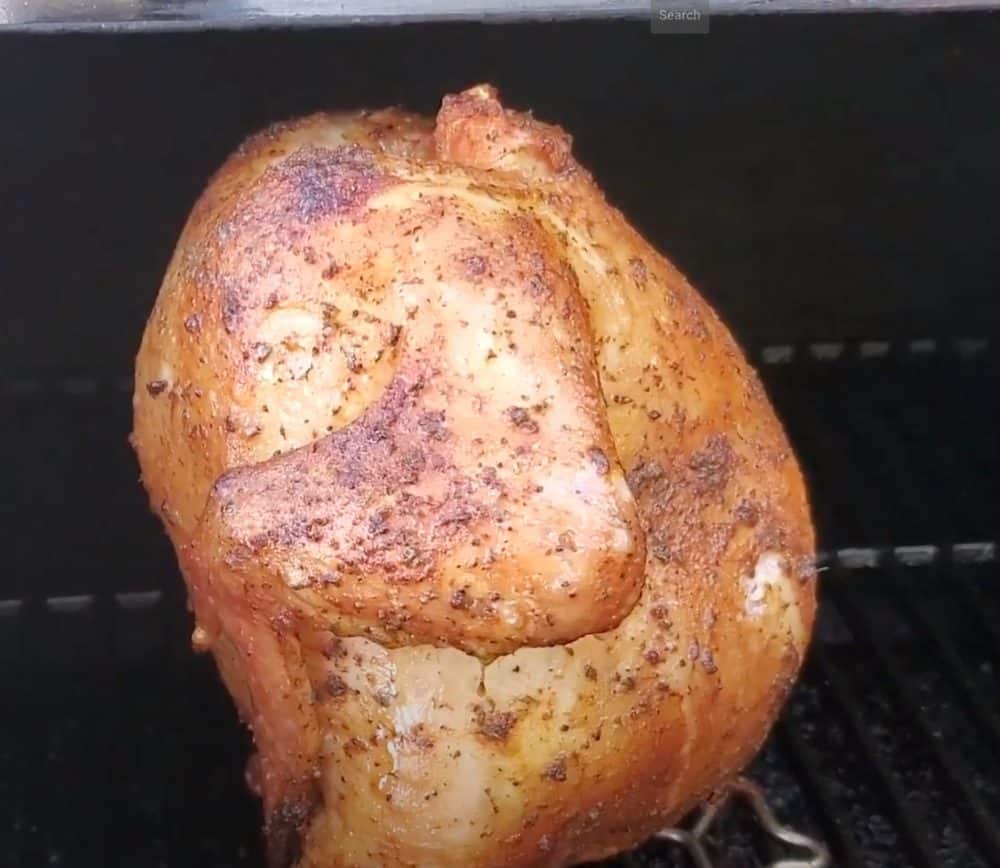
There really is no need to rotate the chicken around during the cook unless you really want to, as the pellet grill provides indirect heat like an oven and will still crisp up the skin at 325°F.
A beer can chicken will take between 1.5-2 hours on a pellet grill at 300-325°F.
This is assuming your chicken is about 5 lbs to start with.
The beer can cooking process slows down the cooking process a little too because you are essentially "stuffing" the cavity of the bird and restricting heat and airflow from that side of the meat.
It may take 2 hours or more if you have a really large chicken, or it is cold outside and you open the lid a lot during the cook.
Pro Tip: If you want the crispiest skin possible, avoid basting or spraying the beer can chicken with anything while it is cooking on the pellet grill.
Keep the lid closed as much as possible, and use the temperature probes, not your watch, to tell you when the chicken is really done.
Target Internal Temperature
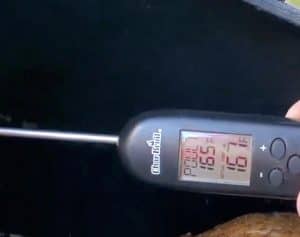
You'll want to monitor the internal temperature of both the chicken breast AND chicken thigh for doneness.
Your beer can chicken is ready to eat when the breast meat hits an internal temperature of 165°F and the thigh meat hits 175°F on your instant read thermometer.
These usually occur at about the same time.
If you don't yet own an instant read thermometer, it's going to be hard to really know exactly when that beer can chicken is done cooking on the pellet grill.
One of our go-to and very affordable favorites is this waterproof model made by Thermopro.

If you prefer a leave-in thermometer you can just monitor from your phone while visiting with guests or doing other stuff, then check out our newest favorite, the MEATER leave in thermometer.
It is extremely accurate and has an incredible 165 foot Bluetooth range and works right with your smartphone so you don't need to carry a separate controller around with you like many other remote thermometers require.
It's got a great free app that is constantly being updated and even has an algorithm to predict how much longer your type of meat will take to cook based on cooking temperature, target temperature, and current internal temperature.
It's like a GPS for your meat!

- Dual temperature sensors enable you to monitor both the internal meat temperature (up to 212°F) and the ambient/external temperature (up to 527°F) at the same time.
- Dishwasher safe
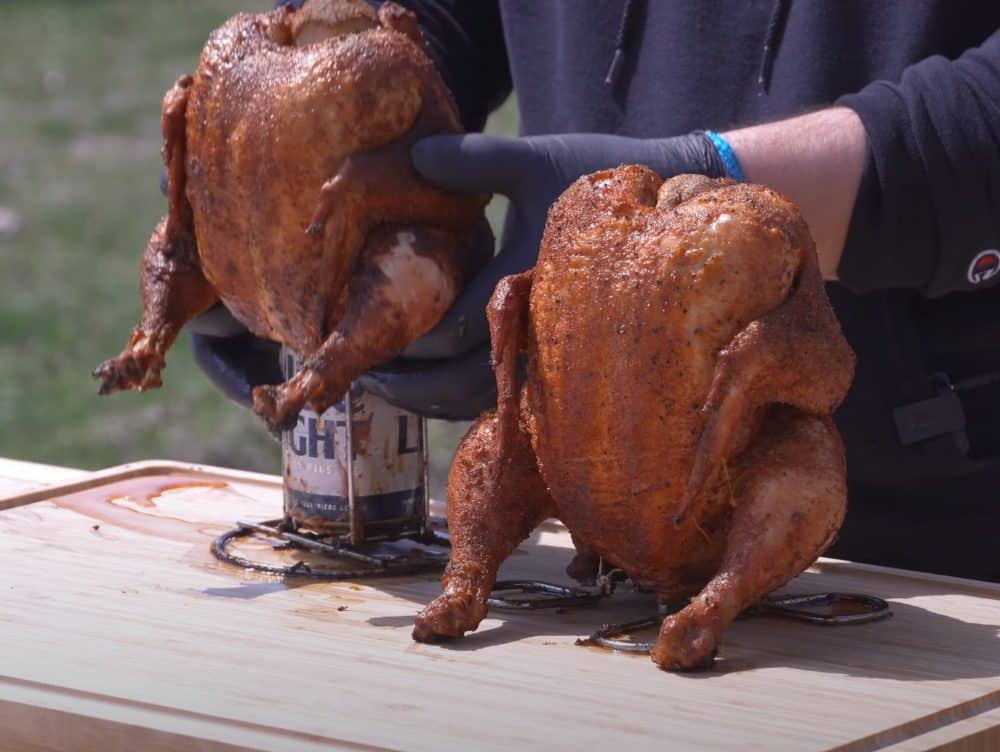
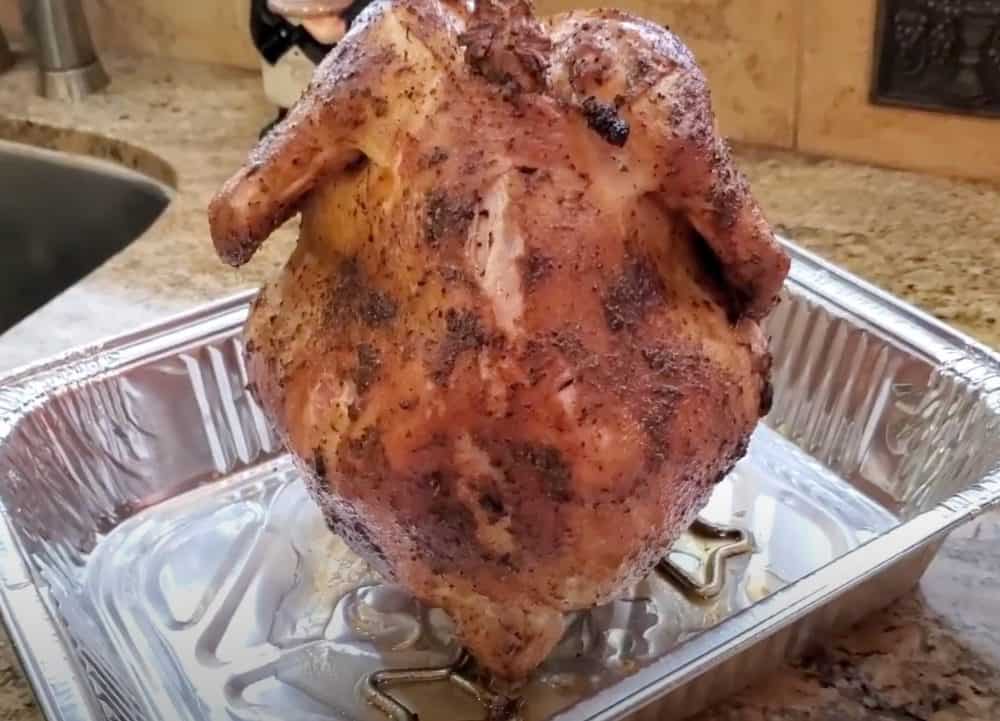
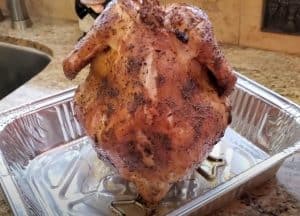
Carefully, remove the chicken from the beer can chicken stand and let the chicken rest for about 15-20 minutes before carving.
Make sure to carefully discard the beer in the stand after it has cooled.
Do not use it in a sauce or marinade unless you heat it up on the stove top first.
You cannot guarantee the liquid got up to the same food safe temperature as the chicken and may still contain harmful bacteria.
Carving and Serving
Let your chicken rest for about 15-20 minutes before carving to help it retain more of its juices.
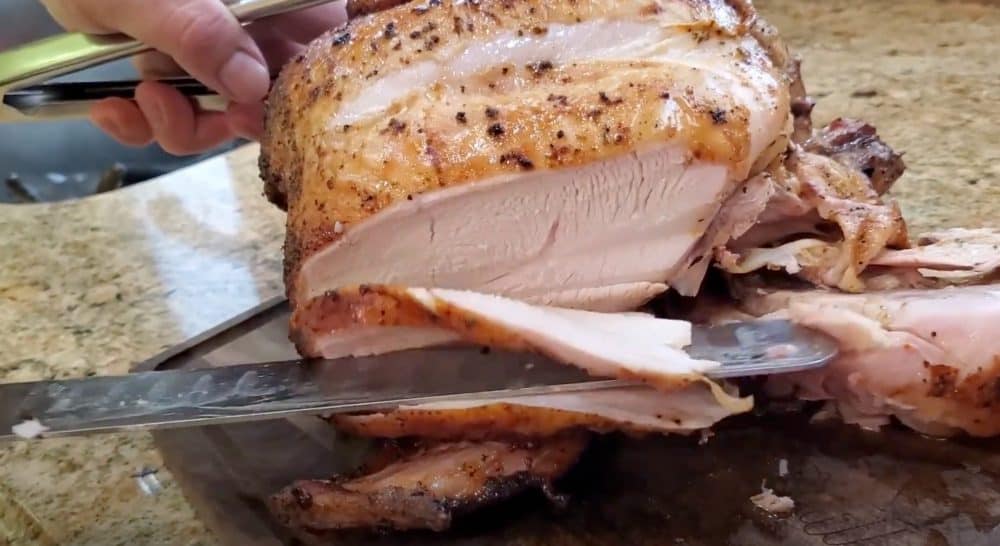
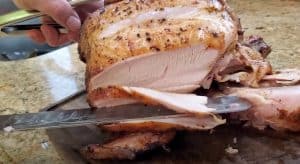
First pull the leg and thigh away from the rest of the bird and cut at the thigh joint. Repeat on the other side.
Now slice each of the breasts off the breastbone, remove the wings, and you are ready to eat!
📖 Recipe
Beer Can Chicken on a Pellet Grill
Equipment
- Pellet Grill
- Large Cutting Board
- Paper Towels
- Large Baking Sheet with Wire Rack
- 2 "Beer Can" Roasting Stands
- Wood Pellets - Hickory, Oak, or Fruitwood
- Internal Meat Thermometers
- Carving Knife
Ingredients
- 2 Whole Chickens
- 2 Cups Your Favorite Beer or Wine
- Your Favorite BBQ rub or our "In a Pinch BBQ Rub" below
Dry Brine
- 4 tablespoon Kosher Salt and Pepper
- 1 tablespoon Fresh Course Ground Black Pepper
In a Pinch BBQ Rub
- 2 tablespoon Dark Brown Sugar
- 2 tablespoon Paprika
- 1 tablespoon Kosher Salt
- ½ tablespoon Course Ground Black Pepper
- ½ tablespoon Chili Powder
- ½ tablespoon Garlic Powder
- 1 teaspoon Onion Powder
- ¼ teaspoon Cayenne Pepper optional
Instructions
Clean the Chicken
- Clean, rinse, and pat dry the whole chickens well with paper towels.

- Trim any excess pieces of skin or fat off of the chickens.


Dry Brine the Chicken Overnight
- Place the chickens on a wire rack placed on top of a baking sheet.
- Mix together the 4 tablespoon Kosher salt and 1 tablespoon pepper, or use your favorite BBQ rub, and sprinkle generously over the tops and bottoms of each chicken. DO NOT use cooking oil to adhere or skin will not get crispy.
- Place the baking sheet in the refrigerator overnight or for at least 4-6 hours.
Remove the Next Day
- Take the chickens out of the refrigerator and wipe off any excess salt still remaining on the outside with a damp paper towel.
- Mix the "In a Pinch" BBQ rub ingredients together and apply some to all sides of the chickens. Or use your favorite BBQ rub for chicken

Smoking the Beer Can Chicken on the Pellet Grill
- Fill the hopper with pellets, start up pellet grill, and preheat to 300-350°F. If your BBQ rub has a lot of sugar in it, choose 300°F. If you only used salt and pepper, go ahead and use 325-350°F.
- Fill your beer can chicken roasters about ½ to ¾ with your chosen beer or wine.

- Carefully position your seasoned whole chickens on the roasting stands with the breasts up and the legs pointing down.

- Place the beer can chickens on the stands, on the pellet grill, with the breast side facing left and the back of the chickens facing right.

- Place an internal temperature probe if you have one into the center of one of the breasts, and anohter one, if you have one, into the middle of one of the thighs.
- Close the lid.
- When the internal temperature of the breasts has reached 165°F, and the internal temperature of the thighs hits 175°F, carefully remove the chickens from the beer can roasting stands and off the pellet grill.


Rest and Carve
- Let the chickens rest for 15-20 minutes before carving to allow the juices to distribute.

- Carve, plate, and serve immediately.

Pete says
Yeah we agree using an actual can is kind of gross when you stop to think about it. Thanks for the tips!