
How to Start a Masterbuilt Electric Smoker
We show you step by step how to start a Masterbuilt electric smoker.
Equipment
- 1 Masterbuilt Electric Smoker
- 1 Aluminum foil pan
- Wood chips
Instructions
Set up the Smoker
- Oil the cooking racks.
- Add a disposable foil pan on the bottom shelf and fill it with water.
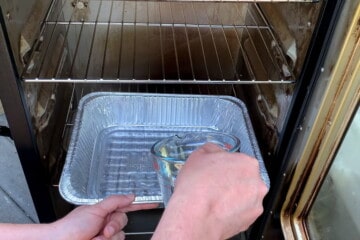
- Make sure that the wood chip pan inside the smoker is in place.
- Insert the drip pan at the bottom with the stands in front so that it angles down toward the back. which will allow the grease to run out through the back into the grease pan.
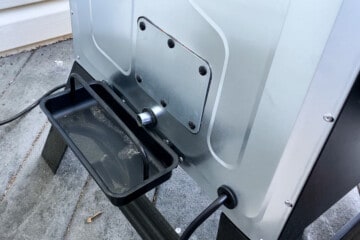
- Check that the grease catching tray on the back of the smoker that rests right under the back vent is in place.
Set the Temperature
- Push the thermometer button and then use the up or down arrows to set the temperature. You can go down from 0 to get directly to 275°F.
- The number will be flashing, so push the temperature button again to set the temperature.
Set the Timer
- Press the button with a timer on it (the button on the bottom right).
- First set the hours by using the up arrow, then push the time button to get to the minutes. You may use the up arrow to add minutes, or leave the minutes set at zero, and push the time button again to set the time.
- At this point, the red heating light should come on to indicate the smoker is heating.

Run Initial Burn Off
- If this is your first time using a brand new Masterbuilt electric smoker, you will need to run a burn off to remove the chemical residue from the factory.
- Set your temperature to 275°F and run it for 3 hours.
- Open the top vent all the way to allow the smoke to escape.
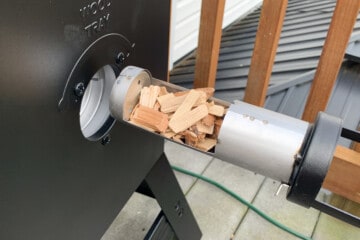
Load the Wood Chips
- Turn the handle on the wood loading container counterclockwise and pull it out. Be careful as the metal part will be hot if your smoker has been heating.
- Fill up the loader with wood and replace it, then turn the handle all the way to the right to dump the chips inside.
Open the Top Vent
- Open the top vent half way to allow smoke to escape the cooking chamber.

- Once smoke starts being produced after 5-10 minutes, it's time to put the food in.
Add the Food
- Add your food to the racks of the Masterbuilt.

- For poultry or fish, one load of wood chips may be enough. For larger cuts of meat like pork shoulder or beef brisket, you may want to do 2-3 loads of wood throughout the cook.
Video
Notes
For more helpful tips on using a Masterbuilt Electric Smoker, check out How to Season a Masterbuilt Electric Smoker, How to Use the Top and Back Vents on an Electric Smoker, and How to Use Wood Chips in a Masterbuilt Electric Smoker