
Smoked Chuck Roast in an Electric Smoker
Chuck Roast rubbed with a savory rub smoked low and slow in an electric smoker and finished in a braising broth before pulling the beef to make deliciously smoked pot roast.You can use any electric smoker such as a Masterbuilt for this recipe.
Servings 8
Calories 400kcal
Cost 30
Equipment
- Heavy Duty Aluminum Foil
- Aluminum Foil Trays
- Cutting Board
- Knife
- Smoking Wood chips
- Large forks or a Pair of BBQ Bear Claws
- Internal Meat Thermometer
- Electric Smoker
- Plastic Wrap
- Fat separator
- Spray Bottle (optional)
Ingredients
- 3-4 lb Chuck Roast
- Olive Oil or Yellow Mustard to apply rub with
- 3 tablespoon of Kosher Salt
- 2 tablespoon of ground black pepper
- 1 tablespoon of paprika
- 1 tablespoon of garlic powder
- ½ tablespoon of onion powder
- 1 teaspoon of cayenne (optional, for spice)
- 3 Cups Beef Broth or Stock 1 cup set aside for spraying (optional)
- ½ Yellow Onion, peeled and sliced
Instructions
Preparing the Chuck Roast
- Trim any excess fat from the exterior of the chuck roast.
- In a bowl, mix all the dry ingredients. This includes the salt, pepper, paprika, cayenne, onion powder and garlic powders. Mix it all to make the dry rub. Keep in mind you can always buy your own dry rub or use your own recipe. It’s up to you.
- Generously apply your rub to coat the entire exterior of the meat.
- Wrap your chuck roast in plastic wrap and place it back in the refrigerator for at least 2 hours, preferably overnight.
Set up the Electric Smoker
- Plug in and turn on your electric smoker. Set the temperature to 225°F.
- Fill your water pan. Make sure all your vents are open.
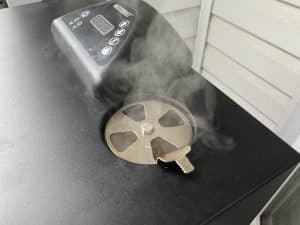
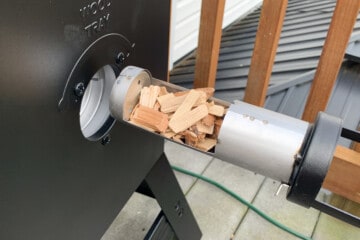
- When the smoker has come up to temperature, place your chosen wood chips in the wood chip loader and insert it back into the smoker.
Smoke the Chuck Roast
- Remove the chuck roast from the refrigerator and from the plastic wrap. Add some additional leftover rub if any came off, and when the smoker is producing smoke, place your meat directly on the top rack.
- Place a disposable aluminum pan a rack below to catch any drips. Place your thermometer inside the roast making sure to not touch the bone.
- Set the timer to 8 hours and close the door to the smoker. Every hour you can spray the exterior of the meat with some beef broth for additional moisture and flavor, however this may add to the cooking time.
- Your meat will take on average 1.5-2 hours total to cook per pound. You can empty and refill more wood chips for the first 1-3 hours.
Texas Crutch
- When the internal temperature of the roast reaches 150°F and has begun to stall, wrap it in aluminum foil or pink butcher paper.
- Insert a probe thermometer through the wrap into the meat and place it back in the smoker.

- Continue cooking until the internal temperature reaches 197°-203°F.
- Place the wrapped roast in the oven on warm (170°F) to rest for 1 hour before slicing or shredding.
Braising the Chuck Roast for Smoked Pot Roast
- When the internal temperature of the meat hits about 150-155°F, likely after about 3-4 hours, remove it from the smoker and place in an empty aluminum foil pan.
- Turn the electric smoker up to 250°F.
- Pour 2-3 cups of the beef broth and the sliced onions into the pan with the chuck roast until the liquid comes up about an inch up the side of the roast.
- Replace the thermometer into the meat and then cover the whole pan tightly with aluminum foil. Place back in the smoker. There is no need to use additional wood chips after this point.
- Continue cooking until the internal temperature reaches between 197°-203°F. You can open up the pan and flip the roast over once after about 90 minutes then replace into the smoker.
- Once the internal temperature hits 197°-203°F, remove the roast from the smoker and place in an empty aluminum pan. Let it rest for 20-30 minutes.
Resting and Pulling the Beef
- While the roast is resting, skim out the onions and pour the braising liquid from the pan into a fat separator and let it cool.
- Pull your smoked chuck roast using a pair or forks or bear claws. Discard any large pieces of fat and the bone.
- After you finish pulling the smoked pot roast, taste for saltiness and add a small amount of the braising liquid from the fat separator at a time, mixing and tasting as you add, until the smoked pot roast is as moist as you desire it to be. At that point, if it still needs more salt just add salt and pepper, not more liquid. Save any extra braising liquid for reheating leftovers the next day.
- Serve immediately, with or without the onions, or incorporate into another recipe requiring smoked pulled or shredded beef.
Video
Nutrition
Calories: 400kcal