Traeger Baby Back Ribs
Learn step by step how to smoke perfect baby back ribs on a Traeger pellet grill using one of our favorite homemade rubs. We cover how to prep, season, cook, and sauce your baby backs using the 3 2 1 Method used widely in BBQ competitions
Equipment
- Traeger Pellet Grill
- Wood Pellets (preferably fruitwood or oak)
- Empty Spray Bottle
- Rib Rack (optional)
- Aluminum Foil
- Heat Resistant BBQ Gloves
- Basting brush
- Meat Slicing Knife
Ingredients
- 2 Racks Baby Back Ribs
- 2 tablespoon Yellow Mustard
- 1 cup Your Favorite BBQ Sauce such as Blues Hog
BBQ Rub
- 1 cup Dark Brown Sugar
- ½ cup Paprika
- 2 tablespoon Course Ground Black Pepper
- 2 tablespoon Kosher Salt (or ½ tablespoon Table Salt)
- 2 tablespoon Chili Powder
- 1 tablespoon Granulated Garlic
- 1 tablespoon Onion Powder
- 2 teaspoon Cayenne Powder (optional for heat)
Spritz
- ½ cup Apple Juice
- ¼ cup Apple Cider Vinegar
Wrapping Seasonings (optional)
- 1 Cup Dark Brown Sugar
- 2 drizzles Honey
- 2 drizzles Parkay Squeeze butter
- 2 drizzles Tiger Sauce (optional for heat)
Instructions
- Start up the Traeger pellet grill, add your chosen pellets to the hopper, and set the temperature to 250°F
Prepare the Ribs and Spritz
- Remove the membrane from the back each rack of baby back ribs using a knife to get it started in one corner, then grabbing on with a paper towel and pulling towards the opposite corner.
- Apply a thin layer of yellow mustard to the front and backs of each rack of ribs and rub to coat entirely.
- Use your favorite BBQ rub or mix the rub ingredients listed above together in a bowl or shaker.
- Apply a generous amount of rub to the fronts and backs of each slab of baby back ribs. Its ok to leave some rub leftover to apply more throughout the cook if needed.
- Let the rub set on the ribs at room temperature for about 20-30 minutes before putting them on the Traeger.
- While the rub is setting, mix the apple juice and apple cider vinegar together in a spray bottle.
3 - Smoke the Ribs
- Once the Traeger is making smoke and up to 250°F, place the ribs on the grill with the thickest sides to the right (the hotter end of the grill). Use a rib rack if preparing more than 4 racks of baby back ribs at once.
- Close the lid and let the ribs cook for about 90 minutes. You can spritz gently as necessary to keep the meat moist if it begins to look dry.
- After 90 minutes rotate the ribs if one side appears darker than the other and begin checking them about every 15-20 minutes.
- While they are smoking, you can prepare your foil and wrapping ingedients.
2 - Wrap the Ribs
- Lay out 2 long pieces of heavy duty aluminum foil on top of each other on the counter, long enough to double wrap the rack of ribs front and back with the two pieces. Repeat with the other rack.
- Spread ½ cup of brown sugar on each set of aluminum foil, then drizzle some honey, parkay squeeze butter, and Tiger Sauce on each. (this is optional)
- Once the ribs are a nice dark amber color and especially if you begin to see any very dark burning on the bones or ends, usually around the 2.5 hour mark, remove them from the grill using tongs or heat resistant gloves.
- Place the baby back ribs face down into each pile of aluminum foil and ingredients.
- If you would rather not use the wrapping ingredients listed above, place the ribs in the foil face up and add a small amount of apple juice, soda, or beer to the aluminum foil to add some moisture.
- Wrap the ribs tightly in the double layer of aluminum foil and place back on the Traeger and continue to cook at 250°F.
1 - Firm and Sauce the Ribs
- Begin checking the ribs after about 45-60 minutes and every 15 minutes after that. Once you see the meat pulling away from the ends of bones and tenderizing, you can take them out of the foil. This may only take 1 to 1.5 hours rather than 2.
- Carefully remove the ribs form the foil and save the juices in the foil to add to your sauce later. Place the ribs back on the Traeger, face up, and cook for about 30 more minutes at 250°F before saucing.
- While the ribs are cooking, prepare your sauce by mixing you favorite sauce(s) together with some of the juices retained from the foil. Mix in a cup or bowl and set aside.
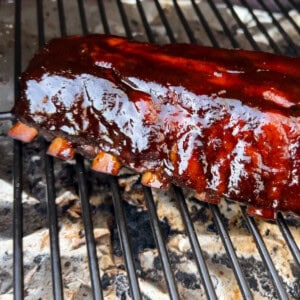
- After the baby backs have been back on the Traeger unwrapped for about 30 minutes and firmed back up a little, gently brush the sauce on with a basting brush.
- Close the lid and continue cooking for another 30 minutes to let the sauce thicken and set on the meat.
Carving and Serving
- Remove the ribs from the Traeger and let them rest for about 15 minutes.
- Turn the ribs upright on their edge so that you can more easily see the ribs running along the bottom up and own.
- Using a good meat slicing knife, cut from top to bottom between the bones in the center of the racks to serve a half rack to each person. Alternatively, you can cut them into 2-3 rib portions and place on a platter to serve a larger crowd.
- Include some sauce on the side for guests to add extra if they desire.
Nutrition
Calories: 700kcal
Tried this recipe?Let us know how it was!